Mach3 Settings for the Rotary Axis
Almost ready!
With the rotary axis assembled and ready to go, it’s time to set up Mach3 to work with it. Rather than go through the entire process here, I’ll give you some of the highlights and refer you to the video on my YouTube channel, linked below.
I will, however, include screen shots of all of the relevant Mach3 windows that I went through in the video. If you right-click the pictures, then select “Open in New Tab, a full-sized picture will open in a new tab on your browser. Feel free to download and save these pictures for future reference, but please don’t post them online without talking to me BEFORE you do it. I would appreciate it.
Initial Steps
The first step is to create a separate Mach3 profile for it. We can clone the profile we use now and modify that clone, or we can clone one of the factory profiles and modify that clone. No matter which way we go, we’re going to have to enter and change a bunch of settings, so I chose to clone the factory Mach3 Mill profile. You don’t want to use Mach3 Turn, because that’s designed for a CNC lathe. A rotary axis is not a CNC lathe – there are some major differences. The rotary axis is just an accessory to the CNC router, so I cloned the Mach3 Mill profile.
The Settings
The second step is to Select Native Units.

Click picture to open full-sized image in a new tab.
Third is to activate the Motor Outputs one by one.

Click picture to open full-sized image in a new tab.
Next is to make sure the A, B, and C axes are configured as ANGULAR axes, and there is no checkmark next to Home Slave with Master Axis box in the General Configuration window.
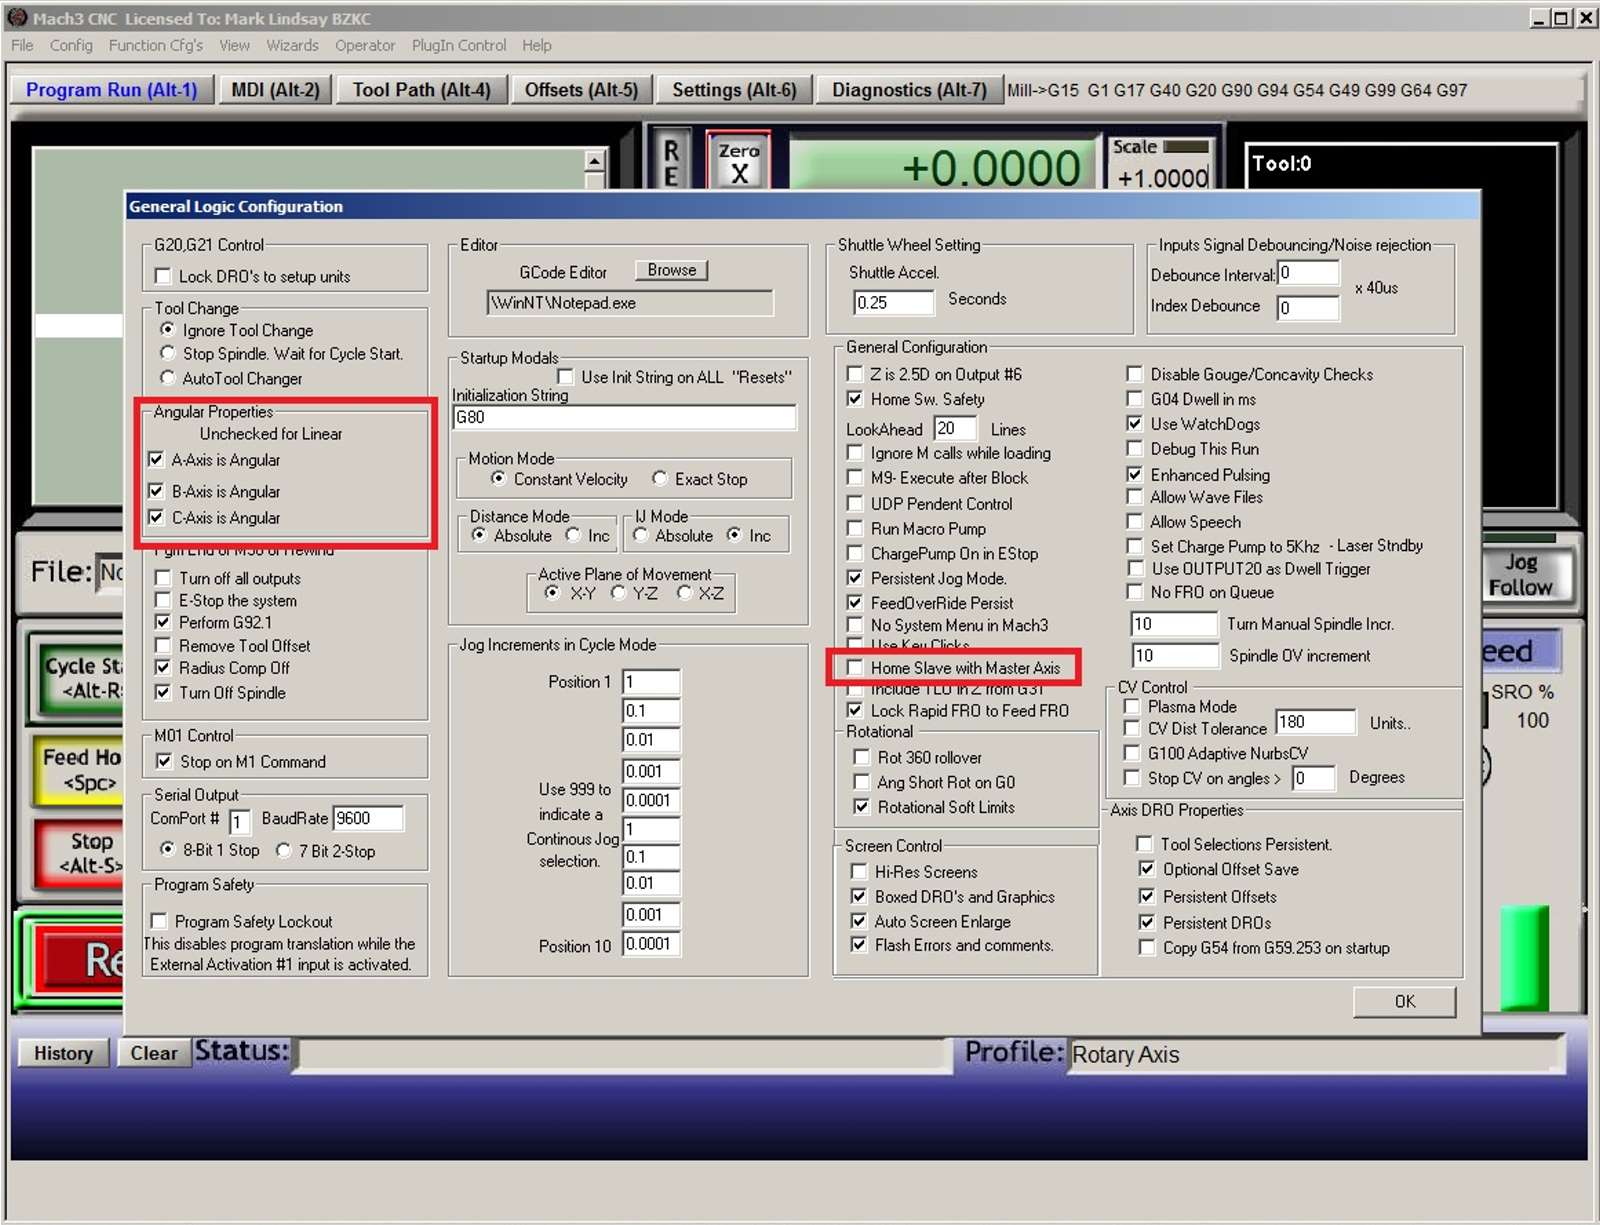
Click picture to open full-sized image in a new tab.
The Really Important Bits
Fifth is the motor setup, which we’ll do by going to the CONFIG menu and selecting Motor Tuning. The A axis is the axis that may cause the most confusion. The thing to remember is that the other axes are LINEAR, and they’re based on Steps Per Inch. The A axis is ANGULAR, and it’s based on Steps Per Degree. So we’ll need to get some info and do a little bit of math before we can enter the Steps Per for this axis.

Click picture to open full-sized image in a new tab.

Click picture to open full-sized image in a new tab.
First, we’ll need to find out how many steps our motor takes to turn one complete revolution. In the case of the Xylotex motor, that number is 3200 steps. So we have our 3200 steps to turn the stepper motor 1 complete revolution. Now we need to know the drive ratio of the rotary axis. In the case of my Sunwin unit, that ratio is 6:1 – meaning it takes 6 revolutions of the stepper motor to turn the chuck 1 complete revolution. So to find out how many steps per degree to enter in the Steps Per box in the Motor Tuning window, the math looks like this:
3200 steps X 6:1 drive ratio = 19,200 steps to turn the chuck 360 degrees, or 1 complete revolution.
(3200 X 6 = 19,200)
19,200 steps divided by 360 degrees in a circle = 53.33333 recurring.
(19,200/360 = 53.33333 recurring.)

Click picture to open full-sized image in a new tab.
So, I now know that the Steps Per for the A axis is 53.33333. I entered 5 places to the right of the decimal only because I don’t know how many Mach3 will let me enter, and I really don’t know if going any further than 5 places to the right of the decimal will matter. If it turns out that it does matter, I can come back and add more.
For the velocity, I entered 2500. Remember that we’re not working in inches per minute in this case – we’re working in DEGREES per minute. For instance, if I set the velocity at 360, that means it will take 1 minute for the axis to make one complete 360 degree revolution. That’s way too slow. At 2500, it should take less than 10 seconds to make 1 complete revolution, which is not very fast at all. Next I’ll set the acceleration to 485 degrees per second. That’s not how fast the axis will turn – that’s how fast it will accelerate to the speed of 2500 degrees per second. Also remember that the speeds we’re setting in this window are the rapid movement rates – NOT the normal feed rates.
Just a Few More To Go
The next step is to make sure there are no axes slaved together. Whether you make any changes in the Slave Axis window or not, it’s time to restart Mach3. Before you do, however, go back to the CONFIG menu, and click Save Settings so that all of these changes will be written to the hard drive and saved.
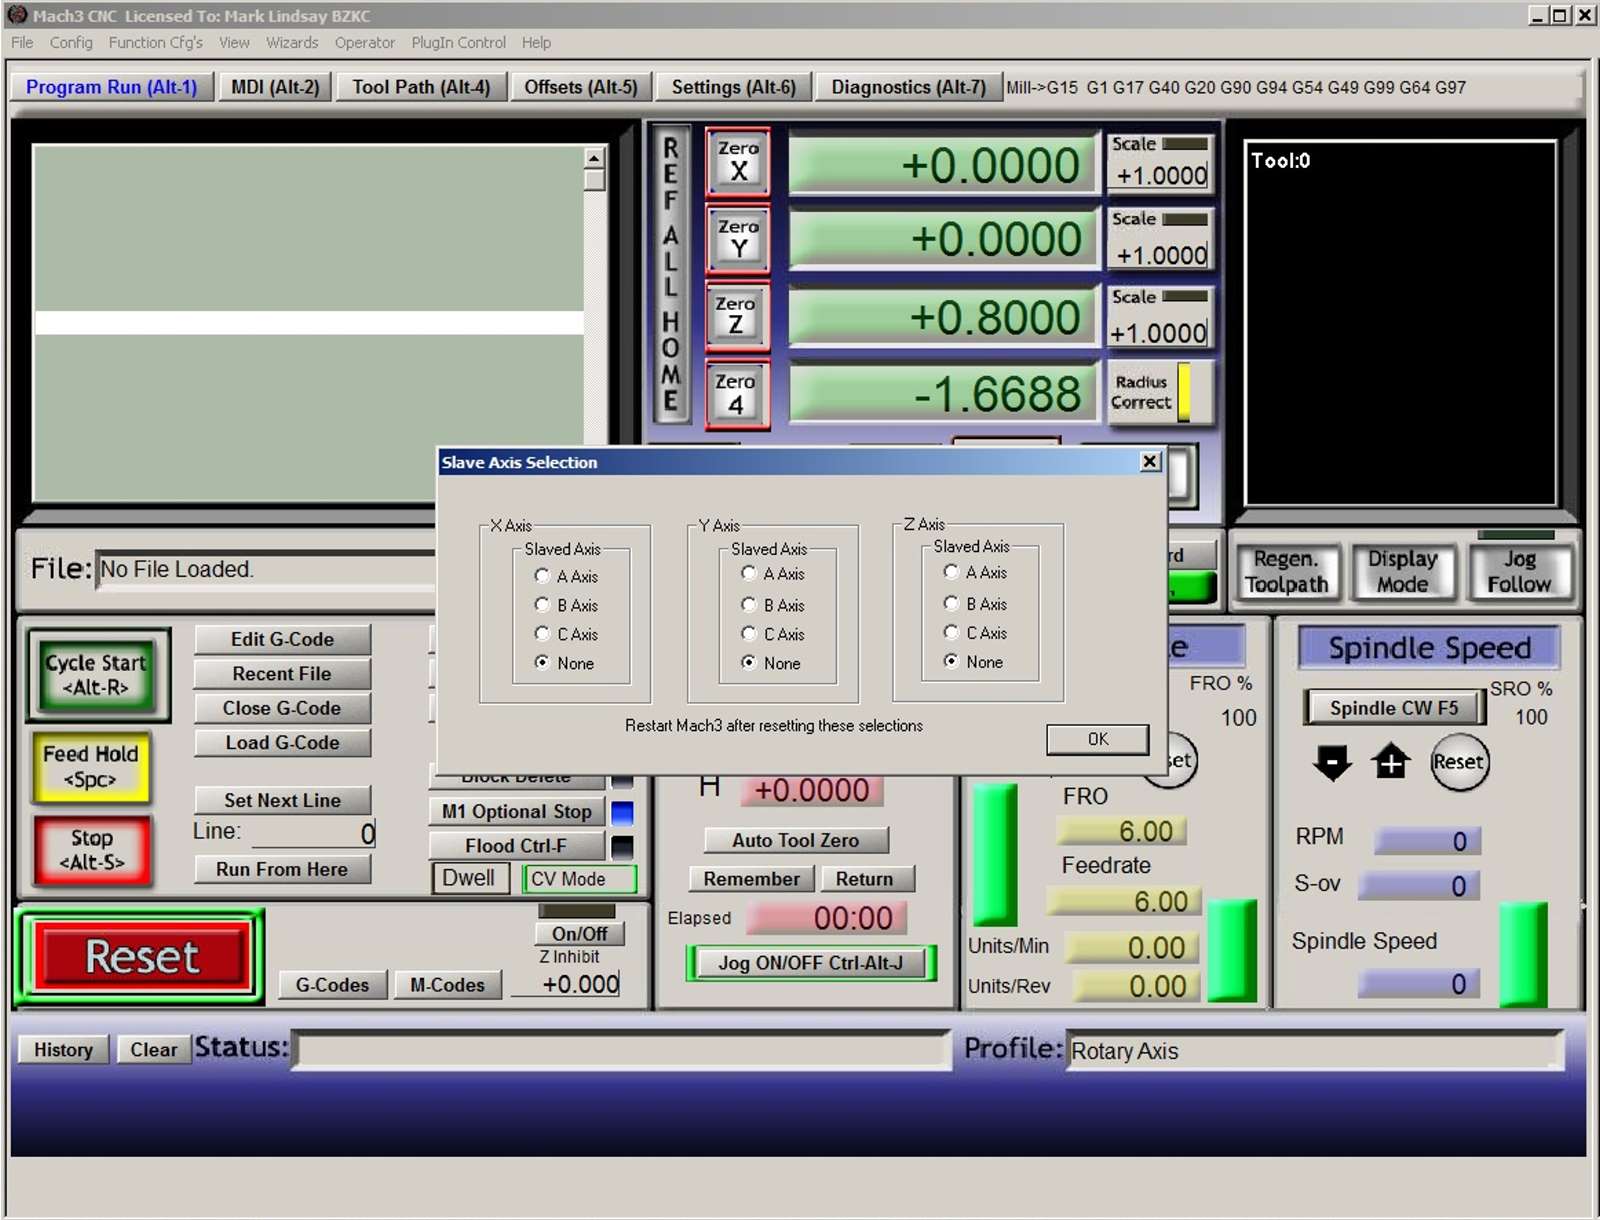
Click picture to open full-sized image in a new tab.
With the profile made and the settings entered, we’re ready to test the rotary axis. Pay attention to the direction of the chuck’s rotation. Positive Rotation should be counter-clockwise. So if I stand in front of the machine, the top of the chuck should appear to be turning toward me. If it’s not, I’ll have to reverse the direction of that stepper motor by going up to the CONFIG menu, selecting Homing/Limits, and putting a checkmark in the Reversed column, next to A Axis.
Next comes programming some hot keys for the rotary axis. If you use a pendant or video game controller, now is the time to program that as well.
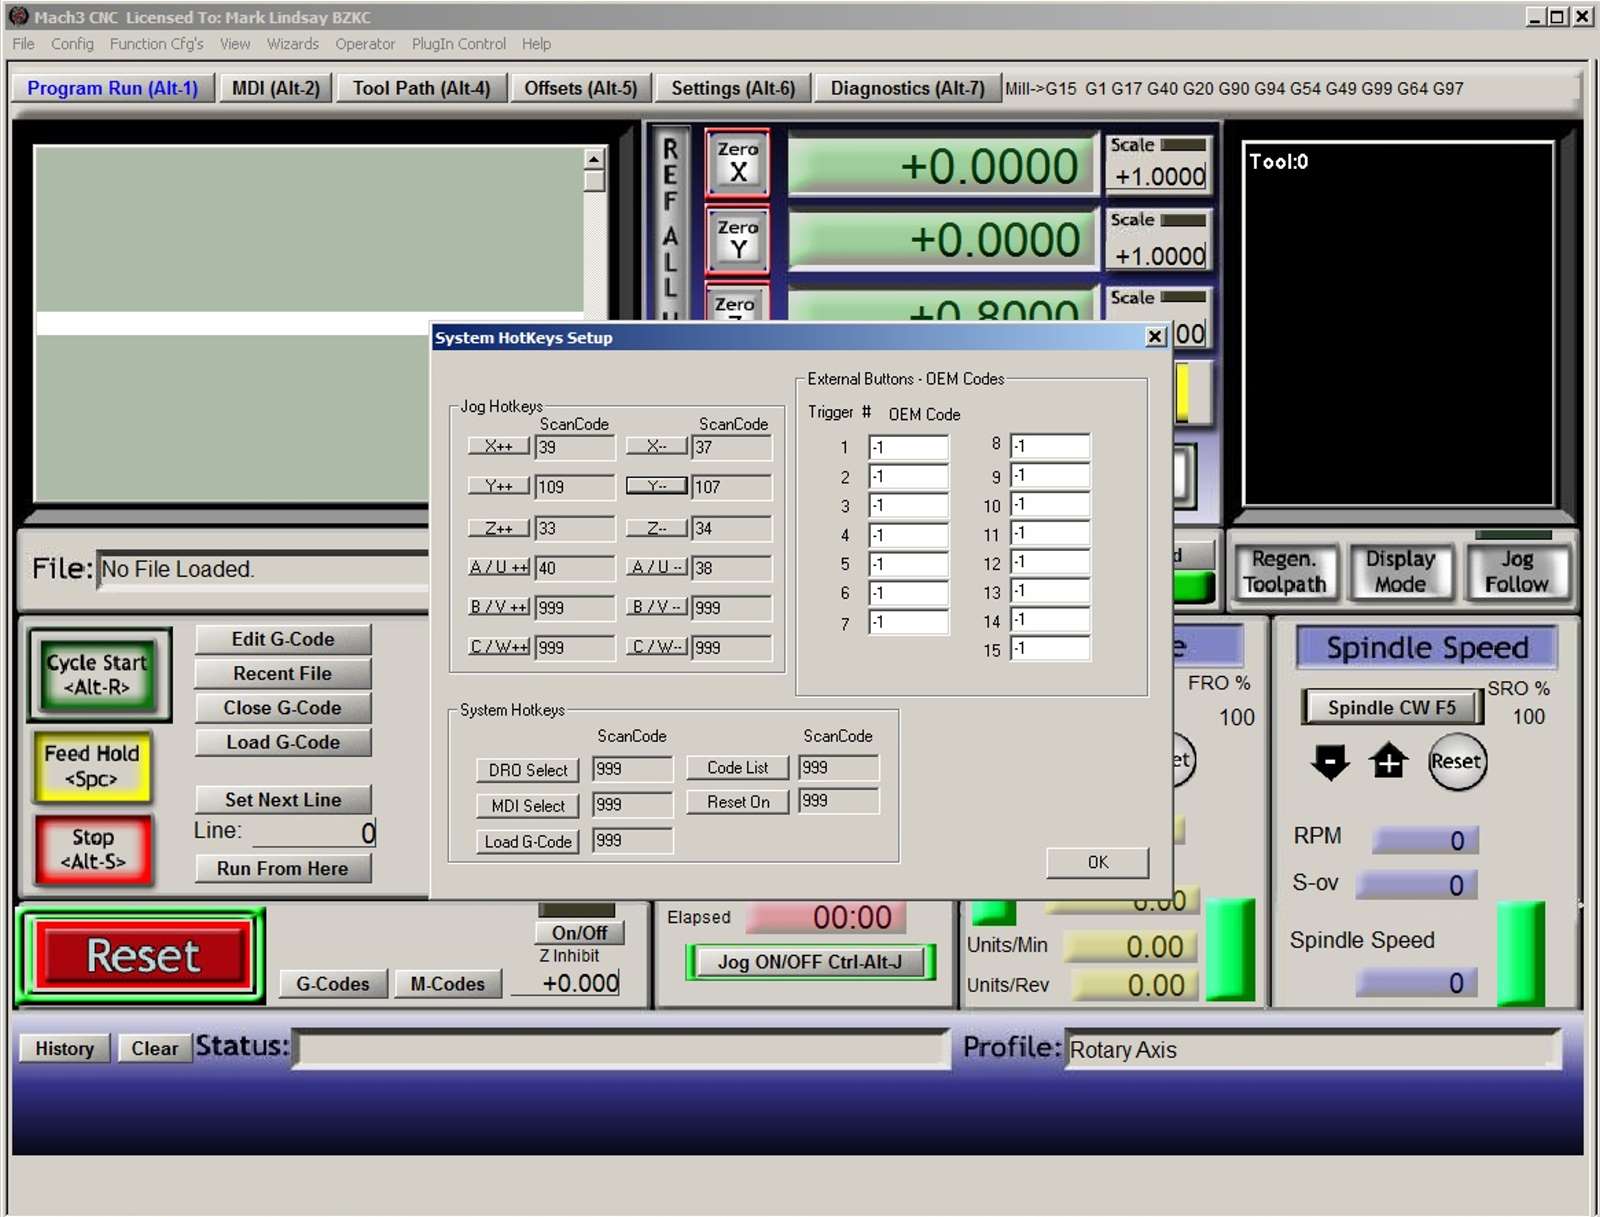
Click picture to open full-sized image in a new tab.
The next 2 settings are used to make sure the toolpath display in Mach3 will display correctly, and the feedrate will be calculated correctly.
First we’ll enter the correct settings in the Toolpath window. Don’t forget to go to CONFIG, and click Save Settings again.

Click picture to open full-sized image in a new tab.
Next click the Settings tab at the top of the screen, and look at the top, right corner for Rotation Radius. Each time I chuck something into the A axis, I’ll want to enter the RADIUS of the piece of material in that DRO in the A Axis row. So if I have a piece that’s 1.5” square, the rotation radius will be .75. So I’ll click the DRO next to A, type in .75, then hit the ENTER key. Now when I go back to the Program Run tab, to the right of the 4 DRO, I can see that the Radius Correct LED is lit up. That lets me know that I remembered to enter the rotation radius into the Settings screen, so my toolpath display should actually display the toolpath correctly. It also means that Mach3 will now calculate the feedrate called for in the g-code correctly. Again, this will have to be done each time we put a piece of material into the chuck of the rotary axis.
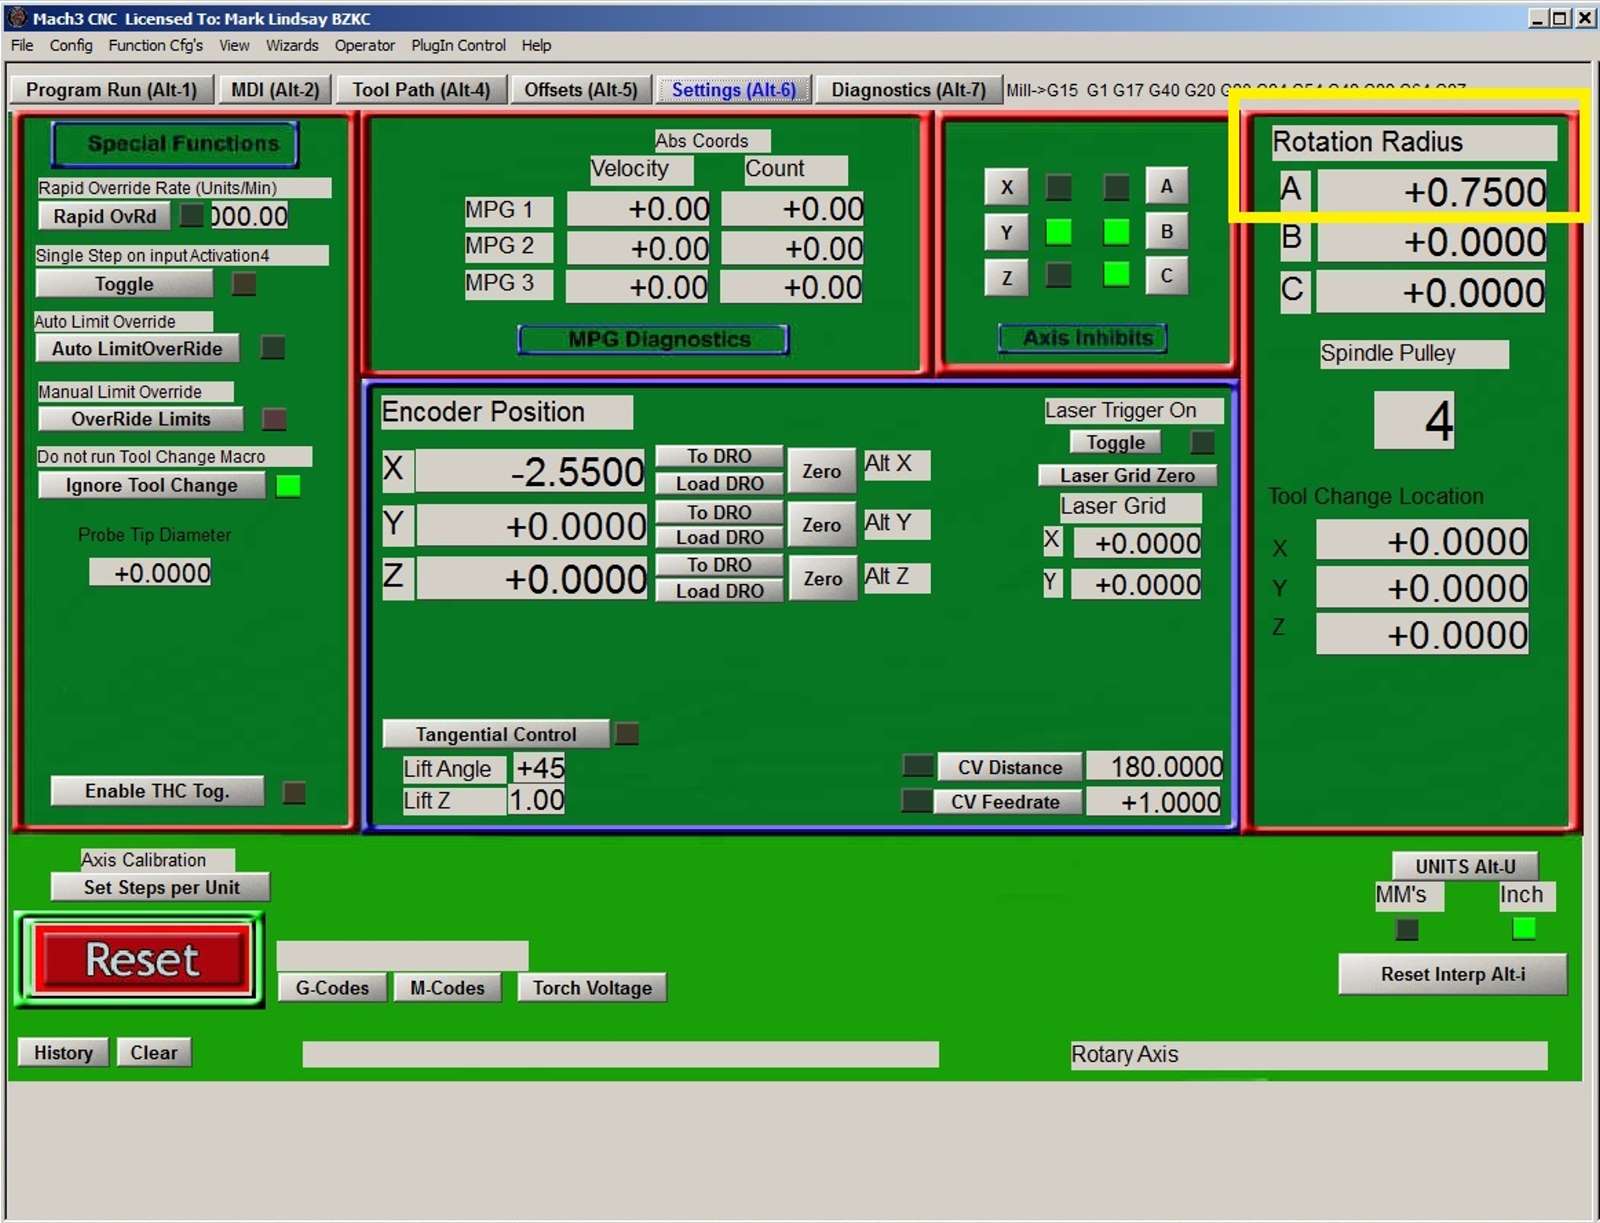
Click picture to open full-sized image in a new tab.
Made it!
That’s a lot of information, I know. It made for a very long video, I know. There’s nothing inherently difficult in setting it up – there are just a lot of things to remember to do. The single hardest part for me was in remembering to think in terms of degrees, rather than inches. I’m working on that, and it is getting easier.
Summing Up
If you’ve stuck with me this far, I’d like to say thank you very much. I know that videos and articles like this are as boring as watching paint dry, but it’s impossible to put this much info into a short presentation.
In my next article, I’ll talk about how I mounted the axis on my Gatton CNC, future mounting plans, and hopefully I’ll get to do some cutting on it! Thanks for stopping by!
Here’s a list of all of the parts I bought to get a rotary axis for my Gatton CNC, with links so you can check them out.
Sunwin Hollow Shaft Rotary Axis
POWGE 10 Teeth HTD 5M Synchronous Pulley
(Make sure to select 6.35mm bore diameter, for 15mm wide pulley, and choose the number of pieces you want.)
(Be sure to select 15mm belt width and 355mm belt length.)
As usual, if you have a question or comment, leave it in the comments section below. Or, if you’d prefer, go over to the Contact Us page and submit it to me there.
If you’d like more info on a Gatton CNC kit of your own, check out Dave Gatton’s home page here.
Until next time, take care and have fun!